话不多说,首先你需要拥有如下设备
- 一个能运行docker容器的设备
- 一个GitHub账号
- 会写md文档
界面更友好的地方
ok首先使用docker容器拉取hexo博客容器
如果设备仅仅用来搭建hexo博客并上传到GitHub,可以不用使用docker容器,使用docker容器是为了避免环境污染。仅搭建hexo博客的化去官网即可,最后可以参考hexo上传到GitHub的方法
docker安装方法参考
使用其他大佬的一键命令安装
1
| curl -sS -O https://kejilion.pro/kejilion.sh && chmod +x kejilion.sh && ./kejilion.sh
|
==以下操作如果输入错误,可以输入列表不存在的数字回车即可重输==
弹出如下界面,依次选择 6 => 8 => y 完成docker的换源以及安装==安装失败选择官方源两次==

推荐阅读:appotry/docker-hexo: hexo docker 一键部署环境。增加CJK中国环境适配和常用软件,hexo 插件等易用设置。开箱即用。 (github.com)
首先cd到你一个指定目录,比如/home/ubt/docker下创建文件夹hexo用于存放docker容器
其中,docker-compose.yaml的内容如下:
1
2
3
4
5
6
7
8
9
10
11
12
13
14
15
16
17
18
19
20
21
22
23
24
| version: '3'
services:
hexo:
container_name: hexo
image: hub.rat.dev/bloodstar/hexo:latest
hostname: hexo
ports:
- "7800:4000"
volumes:
- ${USERDIR}/hexo/blog:/app
env_file:
- .env
environment:
- PUID=${PUID}
- PGID=${PGID}
- TZ=${TZ}
- GIT_USER="yourName"
- GIT_EMAIL="youID@gmail.com"
restart: always
|
.env文件示例
1
2
3
4
| PUID=1000
PGID=1000
TZ="Asia/Shanghai"
USERDIR="/home/ubt/docker/hexo"
|
| 环境变量 |
作用 |
| HEXO_SERVER_PORT |
pm2 http 服务器运行端口,默认是4000 |
| GIT_USER |
git 环境变量用户名 |
| GIT_EMAIL |
git 环境变量邮箱 |
两个文件创建好后使用命令拉去docker镜像
编辑hexo博客框架
如果拉取成功后应该会在docker-compose.yaml同级目录下有hexo文件,这个即你的blog
首先进行主题的拉取,cd到hexo/blog/themes下,将你中意的主题使用git命令拉取,我这里就以我稀罕de主题为例jylzs369/hexo-theme-lagom
1
| git clone https://github.com/jylzs369/hexo-theme-lagom.git
|
git后会有hexo-theme-lagom目录,名字稍后会用到,按照GitHub中这个主题提示进行操作,返回到blog目录
修改文件_config.yml,同样的其他内容按需修改
紧接着,进入容器内,进入后操作与hexo一样
1
| docker exec -it hexo bash
|
创建三个新页面
1
2
3
| hexo new page about
hexo new page categories
hexo new page tags
|
创建结束后,使用命令查看ssh key 部署到GitHub
1
2
| # 查看密钥并复制
cat .ssh/id_rsa.pub
|
详细教程
- 将SSH 公钥复制到剪贴板。 …
- 在任何页面的右上角,单击您的个人资料照片,然后单击Settings(设置)。
- 在用户设置侧边栏中,单击SSH and GPG keys(SSH 和GPG 密钥)。
- 单击New SSH key(新SSH 密钥)或Add SSH key(添加SSH 密钥)。
部署成功后,点击头像旁边的+选择New repository新建仓库
- name中填写格式:
xxx.github.io xxx为你指定的名字
- Create repository,弹出仓库指令
来到hexo容器内(推出容器编辑比较方便),编辑_config.yml文件,找到如下内容,复制,xxx修改为你自己的仓库地址,在刚刚新建仓库页面选择SSH即可看到
1
2
3
4
| deploy:
type: git
repository: git@github.com:xxxxx/xxxx.github.io.git
branch: master
|
保存后继续docker进入容器内部
1
| docker exec -it hexo bash
|
使用三连(一blog大佬中看到的解释,挺好玩的)指令
1
2
3
| hexo clean
hexo g
hexo d
|
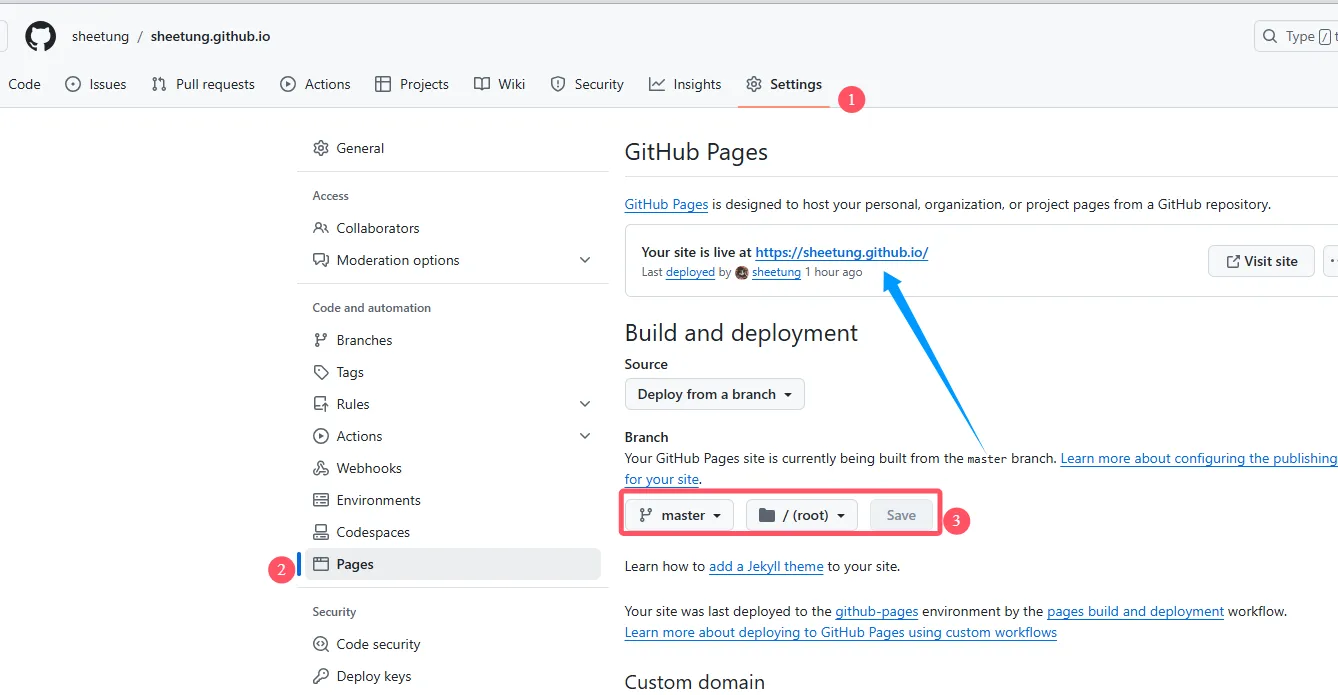
不出意外此时的GitHub中已有hexo内容,接下来来到仓库选择Setting,按照如图设置后save,等待一会就像蓝色箭头处的链接,blog到此创建成功
附录
我自己的config文件
_config.yml
1
2
3
4
5
6
7
8
9
10
11
12
13
14
15
16
17
18
19
20
21
22
23
24
25
26
27
28
29
30
31
32
33
34
35
36
37
38
39
40
41
42
43
44
45
46
47
48
49
50
51
52
53
54
55
56
57
58
59
60
61
62
63
64
65
66
67
68
69
70
71
72
73
74
75
76
77
78
79
80
81
82
83
84
85
86
87
88
89
90
91
92
93
94
95
96
97
98
99
100
101
102
103
104
105
106
107
108
109
110
111
112
113
114
115
116
117
118
119
120
121
122
123
124
125
126
127
128
129
130
131
132
133
134
135
136
137
138
139
140
141
142
143
144
145
146
147
148
149
150
151
152
153
154
155
156
157
158
159
160
161
162
163
164
165
166
167
168
169
170
171
172
173
174
175
176
177
178
179
180
181
182
183
184
185
186
187
188
189
190
191
192
193
194
195
196
197
198
199
200
201
202
203
204
205
206
207
208
209
210
211
212
213
|
title: Sheetung's blog
subtitle: ''
description: ''
keywords:
author: sheetung
language: en
timezone: ''
url: https://sheetung.github.io
permalink: :year/:month/:day/:title/
permalink_defaults:
pretty_urls:
trailing_index: true
trailing_html: true
source_dir: source
public_dir: public
tag_dir: tags
archive_dir: archives
category_dir: categories
code_dir: downloads/code
i18n_dir: :lang
about_dir: about
skip_render:
new_post_name: :title.md
default_layout: post
titlecase: false
external_link:
enable: true
field: site
exclude: ''
filename_case: 0
render_drafts: false
post_asset_folder: false
relative_link: false
future: true
syntax_highlighter: highlight.js
highlight:
line_number: true
auto_detect: false
tab_replace: ''
wrap: true
hljs: false
prismjs:
preprocess: true
line_number: true
tab_replace: ''
index_generator:
path: ''
per_page: 10
order_by: -date
default_category: uncategorized
category_map:
tag_map:
meta_generator: true
date_format: YYYY-MM-DD
time_format: HH:mm:ss
updated_option: 'mtime'
per_page: 10
pagination_dir: page
include:
exclude:
ignore:
theme: hexo-theme-lagom
deploy:
type: git
repository: git@github.com:sheetung/sheetung.github.io.git
branch: master
|
hexo主题中的config !!!两个config不一样,主题中的请根据不同主题要求自信修改
1
2
3
4
5
6
7
8
9
10
11
12
13
14
15
16
17
18
19
20
21
22
23
24
25
26
27
28
29
30
31
32
33
34
35
36
37
38
39
40
41
42
43
44
45
46
47
48
49
50
51
52
53
54
55
56
57
58
59
60
61
62
63
64
65
66
67
68
69
70
71
72
73
74
75
76
77
78
79
80
81
82
83
84
85
86
87
88
89
90
91
92
93
94
95
96
97
98
99
100
101
102
103
104
105
106
107
108
109
110
111
112
113
114
115
116
117
118
119
120
121
122
123
124
125
126
127
128
129
130
131
132
133
134
135
136
137
138
139
140
141
142
143
144
145
146
147
148
149
150
151
152
153
154
155
156
157
158
159
160
161
162
163
164
165
166
167
168
169
170
171
172
173
174
175
176
177
178
179
180
181
182
183
184
185
186
187
188
189
|
page_title: Sheetung blog
menu:
home: /
archives: /archives/
categories: /categories/
tags: /tags/
about: /about/
social_links:
github:
link: https://github.com/sheetung
icon: ''
mail:
link: mailto:sheetung@cutech.space
icon: ''
rss:
link: /atom.xml
icon: ''
index:
show_all_posts: false
post_count: 5
sort_updated: false
archive:
sort_updated: false
post:
show_updated: true
copyright:
neme: Sheetung
start_year: 2024
end_year:
favicon:
desktop:
url: /images/favicon.ico
android:
url: /images/favicon-android.png
apple:
url: /images/favicon-apple.png
valine:
appid: ''
appkey: ''
placeholder: ''
visitor: true
google_analytics:
enabled: false
id: ''
baidu_analytics:
enabled: false
id: ''
|
常用命令
1
2
3
4
5
6
7
8
9
10
11
12
13
14
15
16
| hexo server #启动本地服务器,用于预览主题。Hexo 会监视文件变动并自动更新,除修改站点配置文件外,无须重启服务器,直接刷新网页即可生效。
hexo server -s #以静态模式启动
hexo server -p 4000 #更改访问端口 (默认端口为 5000,’ctrl + c’关闭 server)
hexo server -i IP地址 #自定义 IP
hexo clean #清除缓存 ,网页正常情况下可以忽略此条命令,执行该指令后,会删掉站点根目录下的 public 文件夹
hexo g #生成静态网页 (执行 $ hexo g后会在站点根目录下生成 public 文件夹, hexo 会将”/blog/source/“ 下面的.md 后缀的文件编译为.html 后缀的文件,存放在”/blog/public/ “ 路径下)
hexo d #自动生成网站静态文件,并将本地数据部署到设定的仓库(如 github)
hexo init 文件夹名称 #初始化 XX 文件夹名称
npm update hexo -g#升级
npm install hexo -g #安装
node -v #查看 node.js 版本号
npm -v #查看 npm 版本号
git --version #查看 git 版本号
hexo -v #查看 hexo 版本号
hexo new page “music” #新增页面music
hexo new post “文章名称” #新增文章
|
有关lagom主题的bug
完美解决hexo下分类和标签无法显示的问题 · Issue #2 · Mrcxt/blog (github.com)
概述
今天更换了一个新的主题,之后发现无法正常添加 分类页 和 标签页,经过一下午的研究,终于找到了最完美的解决方案。
解决方案
步骤一
你需要在 hexo 根目录的 source 文件夹下新建一个 tags 文件夹,然后在 tags 文件夹里面新建一个 index.md 文件。快捷命令为:
步骤二
编辑 index.md 文件,内容如下:
1
2
3
4
5
| ---
title: "tags"
type: tags
layout: "tags"
---
|
重点来了
注意!这里面最重要的就是 layout 选项,后面的参数对应的是你 主题文件夹下 layout 文件夹下第一级的布局文件。比如,我的主题是用 ejs 写的,那么对应的就是 layout/tags.ejs,如果没有,那么就会出现空白的现象!如果你的 tags 文件的命名时 a.ejs,那么你就应该写成 layout: "a"。
步骤三
编辑主题配置文件:
1
2
3
4
| nav:
home: /
about: /about
tags: /tags
|
步骤四
编辑 hexo 配置文件 Directory 选项。
检查一下名称是否对应
至此,完美解决。